Web Hosting
Specific information about features and operations of Shared Hosting and High-Performance Hosting: Hosterra One, VPS-AN & VPS-LS.
- Getting Started
- User interface overview
- Plesk
- Server access
- Mail services
- Backup & Restore
- Security
- Server tools
Getting Started
We appreciate that you trust Hosterra to host your Internet services.
This page is a guide to help you quickly get started with your new server. We know that the Hosterra interface is probably a bit different from the ones you are used to... So you will find here links to the most useful articles to get started.
If you can't figure out how to perform an operation on your server in this startup guide, feel free to open a support request.
Access to your server
You can access and administer your server via a web interface called Plesk.
Security of your server
Hosterra implements many tools to secure your server. These tools are operated by Hosterra and you don't have the ability to configure them. However, there are some actions you can take to further secure your server:
- Change the initial password of the server.
- Set up an account delegation if needed (Hosterra account).
- Create additional users for third parties.
Development and operations on your server
If you want to perform advanced management of your server or develop special things, you can use specific command line tools:
- SSH access.
- Using PHP, Composer and WP-CLI.
- Using Node, NPM and NPX.
User interface overview
From the Hosterra dashboard, you can access the details of your Web Hosting service(s). These details are presented as follows:
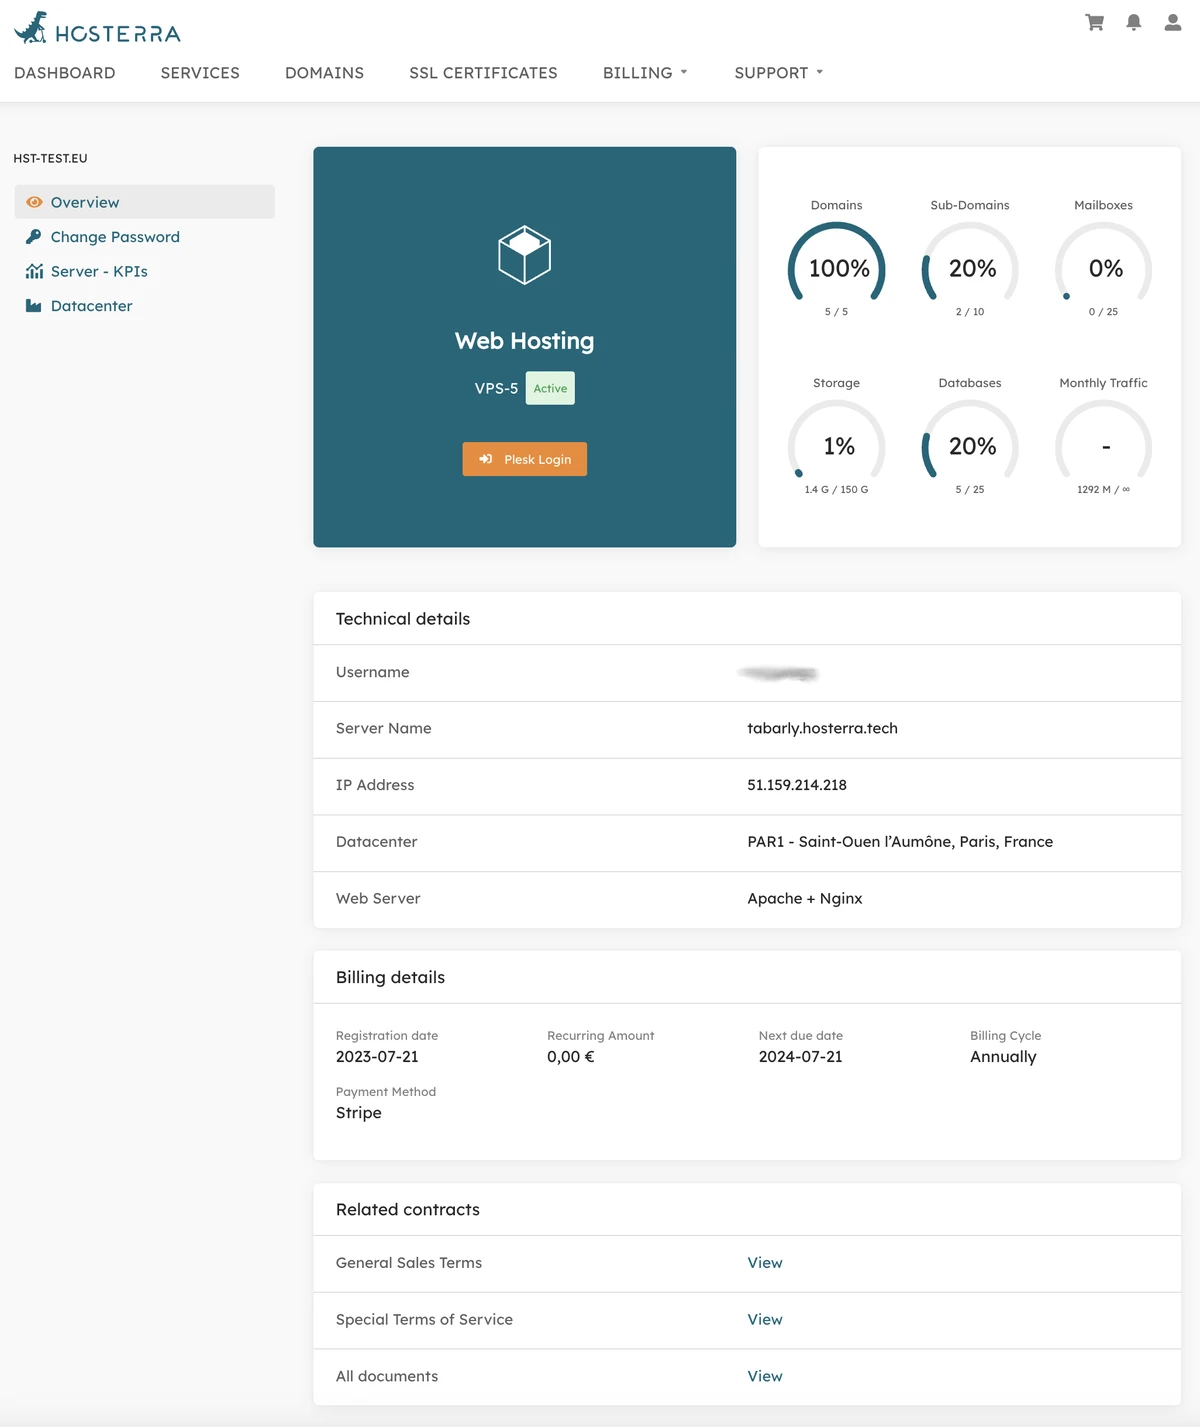
Left side menu
This menu gives you access to secondary details page to:
- change your server password;
- access environmental monitoring of the server;
- get details about the datacenter where the server is located.
Plesk access box
With the orange button, you can automatically log-in to your server, thanks to SSO.
Consumption box
Gives details about main consumption indicators.
Note these consumptions are refreshed once per hour.
Technical details
All the technical information you need to know about your server.
Billing details
A quick overview about prices and billing cycle of your server.
Related contracts
The contracts you signed when you subscribed to this offer.
Note the given link take you to the exact contracts you signed as they were at the time of signing, and therefore as they apply in your case, for this server.
Plesk
All Hosterra's web hosting servers are equipped with Plesk software, which allows you to make all the operational settings for these services.
The version of Plesk installed on your server is a special version, customised to take into account the characteristics of Hosterra servers and services. Please note that the screenshots in this book may differ slightly from what you will see on your server. This is because the version installed on your server is regularly updated and improved.
Official documentation
Plesk is a very popular and widely used piece of software. So you'll find plenty of documentation, tutorials and videos about it on the web.
The reference for using Plesk can therefore be found directly on the Plesk website:
- the Quick Start Guide
- the Customer's Guide
It contains everything you need to know to set up your server's standard functionalities correctly.
However, if you want to understand and use the features specific to Hosterra, we recommend that you read this present book too.
Server access
You can access your server via a number of methods and tools.
Web UI
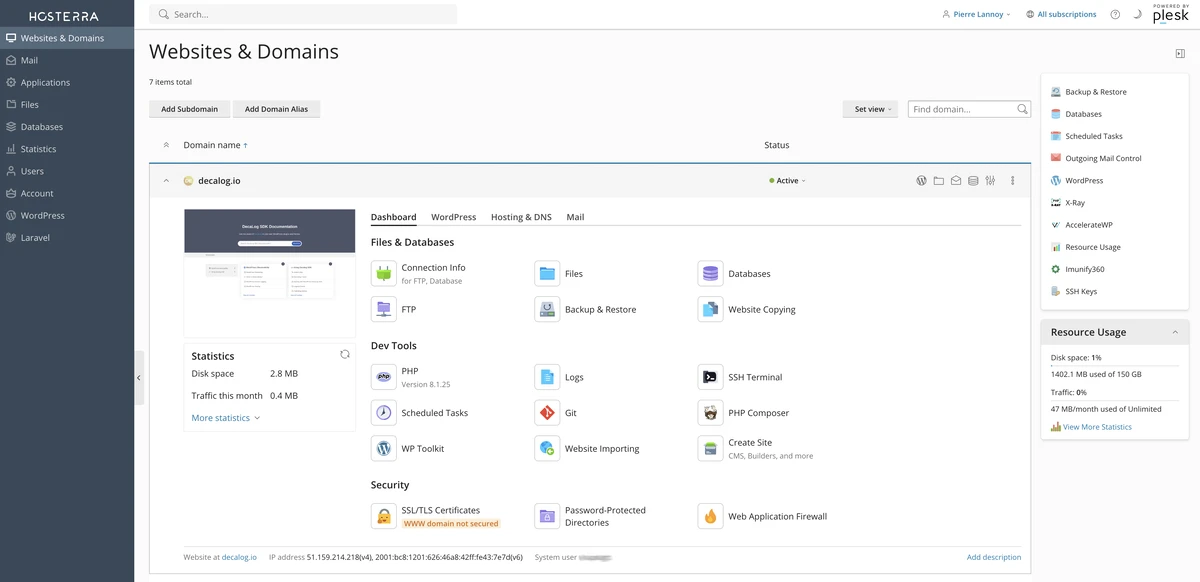
The easiest way to access your server is from your Hosterra account. To do this, click on the service you want to manage and then in the service details page, click on the Plesk Login button to access the Plesk interface of your server.
You can also connect directly to your server Plesk interface with the credentials and url we sent you by email after your purchase…
SSH access
You can connect to your server via SSH in two different ways:
Web SSH access
You can access SSH directly through the Plesk web interface. To do so, connect to your server from your Hosterra account. Then go to the dashboard of the concerned domain and click on SSH Terminal.
Command line SSH access
For security reasons, the Web Hosting servers are only reachable via SSH with keys (and not with a password). To access to your server you have to start by adding the key(s) you want to use.
Once a key added to your server, you can access it by the standard way:
> ssh username@tabarly.hosterra.tech

⣴⠛⠛⠛⠛⠛⠛⠛⠛⠛⠛⠛⠛⠛⠛⠛⠛⠛⠛⠛⠛⠛⠛⠛⠛⠛⠛⠛⠛⠛⠛⠛⠛⠛⠛⠛⠛⠛⠛⠛⠛⠛⠛⠛⠛⠛⠛⠛⠛⠛⠛⠛⠛⠛⠛⠛⠛⠛⠛⠛⠛⠛⠛⠛⠛⠛⠛⠛⠛⠛⠛⠛⠛⠛⠛⠛⠛⣦
⠻⣤⣤⣤⣤⣤⣤⣤⣤⣤⣤⣤⣤⣤⣤⣤⣤⣤⣤⣤⣤⣤⣤⣤⣤⣤⣤⣤⣤⣤⣤⣤⣤⣤⣤⣤⣤⣤⣤⣤⣤⣤⣤⣤⣤⣤⣤⣤⣤⣤⣤⣤⣤⣤⣤⣤⣤⣤⣤⣤⣤⣤⣤⣤⣤⣤⣤⣤⣤⣤⣤⣤⣤⣤⣤⣤⣤⠟

                            ⣴⣿⣿⣷⣶⣶⣦⣤⣄
                           ⢸⣿⣿⣿⣿⣿⣿⣿⣿⣿
                           ⣿⣿⣿⣿⣿⣯⣉⣉⣉⡉
                        ⠠⣤⣼⣿⣿⣿⣿⠟⠛⠛⠛⠛⠋                      WELCOME!
   ⠀⠀⠀⠀⠀⠀⠀⠀⠀⠀⠀⠀⠀⠀⠀⠀⠀⠀⠀⠀⢹⣿⣿⣿⣿⡟
   ⠀⠀⠀⠀⠀⠀⠀⠀⠀⠀⠀⠀⠀⠀⠀⠀⠀⢲⣶⣶⣿⣿⣿⣿⣿⠁⠀⠀⠀⠀⠀⠀⠀           HOSTERRA SERVERS ACCESS ARE
   ⠀⠀⠀⠀⠀⠀⠀⠀⠀⠀⠀⠀⠀ ⢀⣀⠀⢈⣿⣿⣿⣿⣿⣿⣿⣄⠀⠀⠀⠀⠀⠀          SUBMITTED TO PRIVACY & SECURITY
   ⠀⠀⠀⠀⠀⠀⠀⠀⠀⠀⠀⠀⠀⠀⠀⣿⣿⣿⣿⣿⣿⣿⣿⣿⣿⣿⣷⣄⠀⠀⠀⠀                     POLICIES
   ⢀⠀⠀⠀⠀⠀⠀⠀⠀⠀⠀⠀⣤⣀⣠⣿⣿⣿⣿⣿⣿⣿⣿⡟⣿⣧⠙⠻⣷⣄⡀
   ⠘⣷⣄⠀⠀⠀⠀⠀⢀⠀⠀⠀⣿⣿⣿⣿⣿⣿⣿⣿⣿⣿⣿⠃⠾⠿⠟⣿⠛⠛⠁⠀               LEGAL.HOSTERRA.EU/SSH
   ⠀⠘⣿⣿⣦⣀⠀⠀⢸⣿⣦⣾⣿⣿⣿⣿⣿⣿⣿⣿⣿⣿⠏⠀⠀⠀⠀⢸⡇
   ⠀⠀⠘⢿⣿⣿⣿⣿⣿⣿⣿⣿⣿⣿⣿⣿⣿⣿⣿⣿⣿⠋⠀⠀⠀⠀⠀ ⣷⠀
   ⠀⠀⠀⠀⠙⢿⣿⣿⣿⣿⣿⣿⣿⣿⣿⣿⣿⣿⣿⣿⣷⡀⠀⠀⠀⠀⠀⠀⣿⡄
   ⠀⠀⠀⠀⠀⠀⠈⠙⠛⠛⠛⣿⣿⣿⡿⠛⠉⠁⠙⢿⣿⣷⡄⠀⠀⠀⠀⣼⠿⣇⠀⠀         ---------[ HOSTERRRA ]---------
   ⠀⠀⠀⠀⠀⠀⠀⠀⠀⠀⣼⣿⡿⠋⠀⢠⣶⣦⡄⠈⠻⣿⣿⣶⣶⠀⣰⡏⢠⣿⣶⡄          Ethical & Sustainable Hosting
   ⠀⠀⠀⠀⠀⠀⠀⠀⠀⠀⢿⡟⠁⠀⠀⠹⣿⣿⠟⠛⠛⠛⠛⠛⠛⠛⠛⠀⠸⢿⣿⠏

⣴⠛⠛⠛⠛⠛⠛⠛⠛⠛⠛⠛⠛⠛⠛⠛⠛⠛⠛⠛⠛⠛⠛⠛⠛⠛⠛⠛⠛⠛⠛⠛⠛⠛⠛⠛⠛⠛⠛⠛⠛⠛⠛⠛⠛⠛⠛⠛⠛⠛⠛⠛⠛⠛⠛⠛⠛⠛⠛⠛⠛⠛⠛⠛⠛⠛⠛⠛⠛⠛⠛⠛⠛⠛⠛⠛⠛⣦
⠻⣤⣤⣤⣤⣤⣤⣤⣤⣤⣤⣤⣤⣤⣤⣤⣤⣤⣤⣤⣤⣤⣤⣤⣤⣤⣤⣤⣤⣤⣤⣤⣤⣤⣤⣤⣤⣤⣤⣤⣤⣤⣤⣤⣤⣤⣤⣤⣤⣤⣤⣤⣤⣤⣤⣤⣤⣤⣤⣤⣤⣤⣤⣤⣤⣤⣤⣤⣤⣤⣤⣤⣤⣤⣤⣤⣤⠟

Last login: Fri Oct 27 15:29:15 2023 from 90.103.x.x
[username@tabarly ~]#SFTP access
For security reasons, the Web Hosting servers are only reachable via SFTP with keys (and not with a password). To access to your server you have to start by adding the key(s) you want to use.
Once a key added to your server, you can access it with any software that supports SFTP (Filezilla, Forklift, etc.). Make sure you use the following settings:
- Server: the full name of your server, for example
tabarly.hosterra.tech - Port:
22 - Username: the username we sent you by email after your purchase
- Password: none
FTP access
For minimal security reasons, the Web Hosting servers are only reachable via FTPs (also called FTP TLS).
So, you must set your favorite software (Filezilla, Forklift, etc.) with the following parameters:
- Protocol: FTP TLS
- Server: the full name of your server, for example
tabarly.hosterra.tech - Port:
21 - Username: the username we sent you by email after your purchase
- Password: the password for this user (initially sent to you by email, and that you have certainly already modified)
Mail services
Your Web Hosting server can be used as a mail server to allow you to host mailboxes, use webmail and connect mail applications.
Configuring the DNS
Before you can use you server as a mail server, you have to specify how users and other applications will access it. It is done via DNS records. Whether you use Hosterra's name servers or those of another provider, the settings are strictly the same.
If your domain is example.com, you have to create the following records:
Type: CNAME
Host: mail
Value: example.com.
Type: CNAME
Host: webmail
Value: example.com.
Type: MX
Host: example.com.
Value: mail.example.com
Priority: 0
Securing the mails delivery
To secure your mail server and the delivery of your e-mails, we recommend that you use the following three protocols:
SPF
The Sender Policy Framework (SPF) allows to declare your mail server as authorized to originate mail for your domain(s).
To configure it, you have to add a single dns record:
Type: TXT
Host: @ (depending of your DNS provider, it can be your domain name example.com, a blank string, a @, etc.)
Value: v=spf1 include:_spf.hosterra.tech ~all
DKIM
DomainKeys Identified Mail (DKIM) is an e-mail authentication method designed to combat mail spoofing.
To configure it, you have to add two dns records. To get these two specific records, just access the Plesk interface of your server, then:
- click, in the left side menu, on Mail;
- click the Mail Settings tab;
- check the Use DKIM spam protection system[…] at the bottom of the page;
- get the 2 dns records to add by clicking on How to configure external DNS.
DMARC
Once SPF and DKIM are configured and operational, you can set Domain-based Message Authentication, Reporting and Conformance (DMARC), a standard email authentication protocol by just adding one more dns record:
Type: TXT
Host: _dmarc
Value: v=DMARC1; p=reject; pct=100
If you configure DMARC before configuring and validating both SPF and DKIM, you will be unable to correctly send emails from your server.
Testing you configuration
To test your SPF + DKIM + DMARC configuration, you can uses tools like:
Backup & Restore
Backing up your Web Hosting server
With the tools bundled with Plesk, you can choose to backup your entire server account without any external software or plugin.
When you are logged in Plesk, you can access the backups manager by opening the Plesk right-hand menu, then click on Backup & Restore:
Remote storage settings
Unless you want to make a local backup (on the same server), it is best to set up remote storage. By defining a remote storage as the target for your backups, you can be sure that your backups will be stored elsewhere than on the server itself. This is a simple precautionary measure to protect against data loss.
To define this remote storage, click on the upper Remote Storage Settings button.
In the opened screen you can select the type of remote storage you want to use as backup destination:
FTP and SFTP
It is a very professional solution. It allows you to use your own backup server (like a NAS), a professional file storage service (like the Flex or Vault services provided by Hosterra), etc. as backup destination. If you have choice, we recommend that you give priority to SFTP, which is a much more secure protocol than FTP.
Cloud drives (Dropbox, Google, OneDrive, etc.)
That's a simple solution, and sometimes free for small backup sizes, but it has a huge privacy implication. Choose this if you fully understand all the implications it has for you, your customers and the users of your sites.
Object storage (S3 Amazon, DigitalOcean and S3-compatible)
It's a professional solution. But it can be expensive, depending on the S3 provider. You have to understand what you are technically doing to use this type of remote storage.
If you don't see the remote storage type you want to use, it is because it is not yet activated on your server. You can ask us to activate it just by asking us in a ticket, it's free!
Instant backup
To perform an instant backup, click on the upper Back Up button in the backups manager.
In the opened screen just choose what you want to backup and the destination. The backup will start as soon you click on the "OK" button.
Note: if you choose to make local instant backups, the size of the backups will count towards your server disk quota.
Scheduled backup
You can ask Plesk to back up your account on a periodic basis. To do so, click on the upper Schedule button in the backups manager.
In the screen that opens, choose the backup frequency by selecting it (daily, weekly or monthly), then set the parameters of the backup it self.
If you want to save on storage size and bandwidth, you can choose incremental backup. If so, Plesk will backup only data that has been modified since the previous backup.
Note: if you choose to make local scheduled backups, the size of the backups will count towards your server disk quota.
If you have chosen LiteSpeed Entreprise or Litemage as your web server when subscribing, remember to specify that the lscache/.cm.log file is to be excluded from any backup. Failure to do so will result in an error during backup.
Security
Managing SSH keys
Plesk allows you to manage SSH keys. These keys are needed when you want to access your server via SSH command-line, use a software (like FileZilla or Forklift) to upload files via SFTP, or set the backup system bundled with your account.
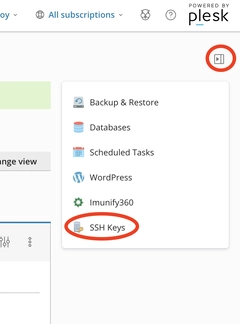
When you are logged in Plesk with the right user, you can access the keys manager by opening the Plesk right-hand menu, then click on SSH Key:
Adding a SSH key to your server
To enable other computer or service to connect to your server via SSH (SFTP, rSync, SSHFS, etc.), you need to add a SSH key relating to this computer or service. In most cases, a key is provided by the service you wish to connect from.
To import this key into your server, in the keys manager, just choose to add a key and paste the key content.
Note this key MUST contain a name, which is not always provided. If it's missing, you have to add it at the end of the key, after a space character (the name of the key itself must not contain spaces).
The format of the key to paste in Plesk should be something like that: ssh-ed25519 ACR5fG...PKOe8MO my_key_name
Removing key(s) from your server
You can delete one or more SSH keys at any time by selecting it/them in the keys manager and clicking on the Remove button.
After the deletion of a key, the external computer or service that was using it to connect will no longer be able to connect to your server.
Changing your server password
The easiest way to change your server password is to do it from your Hosterra account: click on the service you want to manage and then in the window that opened, click in the left side menu on Change Password and follow the procedure.
It is imperative that you change your password after creating your server. The initial password was sent to you by email.
Server tools
Your Web Hosting server comes equipped with many pre-installed and always up to date common tools.
Using PHP, composer and WP-CLI
Your server is fully equipped to perform current PHP opérations from the command line:
PHP
PHP is ready to use, it can be invoked via the php command. The version installed on 01/10/2023 is 8.1.
> php -v
    PHP 8.1.25 (cli) (built: Oct 27 2023 11:17:49) (NTS)
    Copyright (c) The PHP Group
    Zend Engine v4.1.25, Copyright (c) Zend Technologies
      with the ionCube PHP Loader v13.0.2, Copyright (c) 2002-2023, by ionCube Ltd.
      with Zend OPcache v8.1.25, Copyright (c), by Zend Technologies
If you want to use another version of PHP, you will find them in the following paths:
/opt/plesk/php/8.0/bin/php
/opt/plesk/php/8.1/bin/php
/opt/plesk/php/8.2/bin/php
Please note that available PHP versions on Hosterra servers evolve over time. We systematically remove any old version that is no longer being maintained for security by The PHP Group. We add any new version as soon as it is available.
Composer
Composer is also ready to use via the composer command.
> composer -V
    Composer version 2.6.5 2023-10-06 10:11:52
Note that the composer version available on Hosterra servers is always the most recent version.
WP-CLI
WP-CLI is also ready to use via the wp command.
> wp cli version
    WP-CLI 2.9.0
Note that the version of WP-CLI available on Hosterra servers is always the most recent version.
Using Node, NPM and NPX
Your server is fully equipped to perform current NodeJS opérations from the command line:
Node
Node is ready to use, it can be invoked via the node command. The version installed on 01/10/2023 is 18.
> node -v
    v18.18.2
If you want to use another version of Node, you will find them in the following paths:
/opt/plesk/node/18/bin/node
/opt/plesk/node/20/bin/node
/opt/plesk/node/21/bin/node
Please note that available NodeJS versions on Hosterra servers evolve over time. We systematically remove any old version that is no longer being maintained for security. We add any new version as soon as it is available.
NPM & NPX
NPM and NPX are also ready to use via the npm and npx commands.
> npm -v
    10.2.2
Note that the NPM and NPX versions available on Hosterra servers are always the most recent versions.
Rendering html to pdf or image
Your server is equipped to perform html to pdf or image rendering from the command line:
WkHtmlToPdf
WkHtmlToPdf is ready to use, it can be invoked via the wkhtmltopdf command. The version installed on 01/10/2023 is 0.12.6.
> wkhtmltopdf -V
    wkhtmltopdf 0.12.6.1 (with patched qt)
Note that the WkHtmlToPdf version available on Hosterra servers are always the most recent version.
WkHtmlToImage
WkHtmlToImage is ready to use, it can be invoked via the wkhtmltoimage command. The version installed on 01/10/2023 is 0.12.6.
> wkhtmltoimage -V
    wkhtmltoimage 0.12.6.1 (with patched qt)
Note that the WkHtmlToImage version available on Hosterra servers are always the most recent version.