Note the given link take you to the exact contracts you signed as they were at the time of signing, and therefore as they apply in your case, for this server.
# Administration (mailcow) The administration and management of a mailbox or domain is done through an interface called Mailcow. Whatever type of Hosterra Email account you use and whatever your role, you can access Mailcow at [https://hosterra.email](https://hosterra.email). ### Mailbox If you're a user, mailcow offers you an interface and features to [manage your mailbox](https://hosterra.help/books/mail-hosting/chapter/mailbox-settings "Mailbox settings") and its options such as [spam sensitivity](https://hosterra.help/books/mail-hosting/page/spam-sensitivity-vmU "Spam sensitivity"), [disposable aliases](https://hosterra.help/books/mail-hosting/page/temporary-aliases "Temporary aliases"), etc. [](https://hosterra.help/uploads/images/gallery/2024-01/mailcow-user-en.webp)If you are not yet a Hosterra Email customer, you can test this interface with the following credentials: **URL** [https://hosterra.email/](https://hosterra.email/) **User** `demo@example.com` **Password** `demo1234`
### Domain If you're a domain administrator, Mailcow will offer you all the features you need to [manage your domain](https://hosterra.help/books/mail-hosting/chapter/domain-settings "Domain settings"). [](https://hosterra.help/uploads/images/gallery/2024-01/mailcow-admin-en.webp)If you are not yet a Hosterra Email customer, you can test this interface with the following credentials: **URL** [https://hosterra.email/](https://hosterra.email/) **User** `mailadmin_example.com` **Password** `demo1234`
# Webmail (SOGo) Hosterra Email offers a webmail called SOGo. Powerful and easy to use, it's a complete alternative to [client software ](https://hosterra.help/books/mail-hosting/chapter/client-configuration "Client configuration")for managing your messages, meetings and contacts. [](https://hosterra.help/uploads/images/gallery/2024-01/sogo-en.webp)If you are not yet a Hosterra Email customer, you can test SOGo with the following credentials: **URL** [https://hosterra.email/SOGo](https://hosterra.email/SOGo) **User** `demo@example.com` **Password** `demo1234`
# Domain settings The [domain administration interface](https://doc.hosterra.eu/books/mail-hosting/page/administration-mailcow "Administration (mailcow)") lets you set behavior and activate or deactivate options for the entire domain and the mailboxes it contains. # Create a mailbox To create a mailbox on your domain, in your administration interface, click on the **Mailboxes** tab and then on the **Add mailbox** button. The important parameters you need to take into account when creating a mailbox are as follows: **Quota (MiB)**: this defines the maximum size the mailbox can be stored. Although this can be adapted and modified later, remember that the sum of box sizes cannot exceed the domain's maximum quota. **Encryption policy**: we advise you to enforce TLS for both input and output. Really :)Unless you fully understand what you're doing, we advise against modifying authorized protocols and ACLs. If you have any doubts, specific needs or questions on these topics, please don't hesitate to contact Hosterra support.
# Spam sensitivity To set spam sensitivity for incoming mail for the entire domain, go to the **Spam filter** tab. Here you can add sender addresses that should always be considered non-spam (white list) or spam (black list).If you whitelist or blacklist a sender for the domain, users who have declared the same sender [for their own mailboxes](https://hosterra.help/books/mail-hosting/chapter/mailbox-settings "Mailbox settings") will be imposed the domain settings for that sender: domain settings always override mailbox settings.
# Mailbox settings Your [mailbox administration interface](https://doc.hosterra.eu/books/mail-hosting/page/administration-mailcow "Administration (mailcow)") allows you to set the behavior and activate or deactivate your mailbox options. # Mailboxes synchronization You can synchronize an external mailbox with your Hosterra Email mailbox. This can be useful during a [mailbox migration](https://hosterra.help/books/mail-hosting/page/mailbox-migration "Mailbox migration"), the [migration of an entire domain](https://hosterra.help/books/mail-hosting/page/domain-migration "Domain migration") or simply in everyday life to consult two mailboxes in a single reception space. To start synchronizing two mailboxes, go to your [mailbox administration interface](https://hosterra.help/books/mail-hosting/page/administration-mailcow "Administration (mailcow)") and create a synchronization job: [](https://hosterra.help/uploads/images/gallery/2024-01/mailcow-synchro-en.webp) The first field allows you to specify the Hosterra Email mailbox (destination). The following fields allow you to specify the remote mailbox to be used as the source of the synchronization. The polling interval indicates the frequency, in minutes, at which this synchronization task will be launched. For migration purposes, we recommend using the lowest frequency (20 minutes). For permanent use, however, you can specify a higher frequency.You can suspend or delete a synchronization task at any time. In particular, we advise you to delete all synchronization tasks that have been created for a migration, to avoid any side-effects when deleting your account with your previous provider.
# Temporary aliases You can create temporary aliases for your own mailbox. These are "disposable" aliases that allow you, for example, to sign up for online services without using your main address. To create such aliases, click on the **Temporary email aliases** tab.By default, aliases are generated for one year. You can shorten this period by selecting the alias concerned in the list and clicking on the **Actions** button.
# Spam sensitivity To set the spam sensitivity for incoming mail, go to the **Spam filter** tab. Here you can set the score that determines whether mail should be accepted, marked as spam or simply rejected. You can also add sender addresses that should always be considered non-spam (white list) or spam (black list). [](https://hosterra.help/uploads/images/gallery/2024-01/mailcow-spam-en.webp)If your domain administrator has whitelisted or blacklisted a sender, you won't be able to change this behavior for your mailbox: domain settings always override mailbox settings.
# Client configuration You can configure any client software to use your emails, calendars and contacts without going through Hosterra Email [webmail](https://doc.hosterra.eu/books/mail-hosting/page/webmail-sogo "Webmail (SOGo)"). You can do this immediately if you have subscribed to a BasicBox package. However, for SoloBox, FamilyBox, ProBox and CustomBox packages, you need to [configure DNS](https://doc.hosterra.eu/books/mail-hosting/page/dns-configuration "DNS configuration") first. # Standard softwares If your favorite client software is eM Client, KDE Kontact, KMail, Mozilla Thunderbird or Windows Mail, you can set it up simply by choosing to add a new account. After entering your full email address and password, your software will use the automatic configuration issued by Hosterra Email.Some Microsoft applications ask for additional server type information. If this is the case, select "Exchange Server".
If automatic configuration doesn't work, you can still [configure it manually](https://hosterra.help/books/mail-hosting/page/manual-configuration "Manual configuration") to take advantage of all Hosterra Email's features.
# Apple (macOS, iOS, iPadOS, etc.) Your Apple device is configured using a "connection profile". You can download your connection profile by logging on to [your mailbox administration interface](https://hosterra.help/books/mail-hosting/page/administration-mailcow "Administration (mailcow)"). Once you've logged in, you'll find 4 login profiles on the home page. Download the one you wish to use, then open it on your device. It will then be visible at the bottom of the "Privacy and security" section of your device's system settings. All you have to do is activate it by following the suggested steps. # Manual configuration Some client applications are unable to correctly read the "autoconfiguration" information issued by Hosterra Email. If this is the case with your software, you'll need to configure it manually. To help you do this, here's the information you'll need to input: ### Incoming mail You can choose to receive your mail via two protocols: IMAP (mail is stored on Hosterra Email servers) or POP (mail is downloaded and stored in your client software). If you wish to check your e-mails from several devices, you must select IMAP. **IMAP server** : `hosterra.email` Port : `993` Encryption : autodetection or `SSL/TLS` User : your complet email adress Password : your mailbox password **POP/POP3 server** : `hosterra.email` Port : `995` Encryption : autodetection or `SSL/TLS` User : your complet email adress Password : your mailbox password ### Outgoing mail For outgoing mail, always choose the SMTP protocol. **SMTP server** : `hosterra.email` Port : `465` Encryption : autodetection or `SSL/TLS` User : your complet email adress Password : your mailbox password ### Calendars To synchronize your calendars, use the CalDAV protocol Standard **CalDAV** url : `https://hosterra.email/SOGo/dav/` Full **CalDAV** url : `https://hosterra.email/SOGo/dav/user@example.com/Calendar/personal/`Note that some softwares require you to enter the full url rather than the standard one.
### Contacts To synchronize your contacts, use the CardDAV protocol Standard **CardDAV** url : `https://hosterra.email/SOGo/dav/` Full **CardDAV** url : `https://hosterra.email/SOGo/dav/user@example.com/Contacts/personal/`Note that some softwares require you to enter the full url rather than the standard one.
# Available ports If you wish to make a custom configuration for a specific application, you can use the following ports:| Service | Encryption | Server | Port |
|---|---|---|---|
| IMAP | `STARTTLS` | `hosterra.email` | `143` |
| IMAPS | `SSL` | `hosterra.email` | `993` |
| POP3 | `STARTTLS` | `hosterra.email` | `110` |
| POP3S | `SSL` | `hosterra.email` | `995` |
| SMTP | `STARTTLS` | `hosterra.email` | `587` |
| SMTPS | `SSL` | `hosterra.email` | `465` |
If you have a **BasicBox** account, the configuration has been automatically completed and the service is ready for use. So there's nothing more to do.
If you have a **CustomBox** account, the procedure described on this page must be completed for each new domain you add.
Whether your DNS is hosted by Hosterra or another provider, the configuration process is always the same: ### Download the required recordings [Log in to Mailcow](https://hosterra.help/books/mail-hosting/page/administration-mailcow "Administration (mailcow)") using the login details sent to you by e-mail when you purchased the service. If this is your first connection, you will be asked to choose a new password. Next to your domain name, a button on the right, called **DNS**, opens a window giving access to your service's DNS configuration. Ignore red, orange or green warnings the first time. Simply click on the button at bottom left to download the DNS records you'll need. ### Configure your DNS Go to your DNS configuration interface (this may be Hosterra or another provider). And for each line of the previously downloaded file, create or modify the record. There are a total of 11 records to create.If you have registered your domain with Hosterra, your DNS already contains a large number of these records. If this is the case, add only those that are not already present.
### Check your configuration After at least one hour (the minimum time required for your DNS records to propagate), log on to Mailcow and click again on the **DNS** button next to the domain you're setting up. This time, inspect each line and check the colors of the icons: [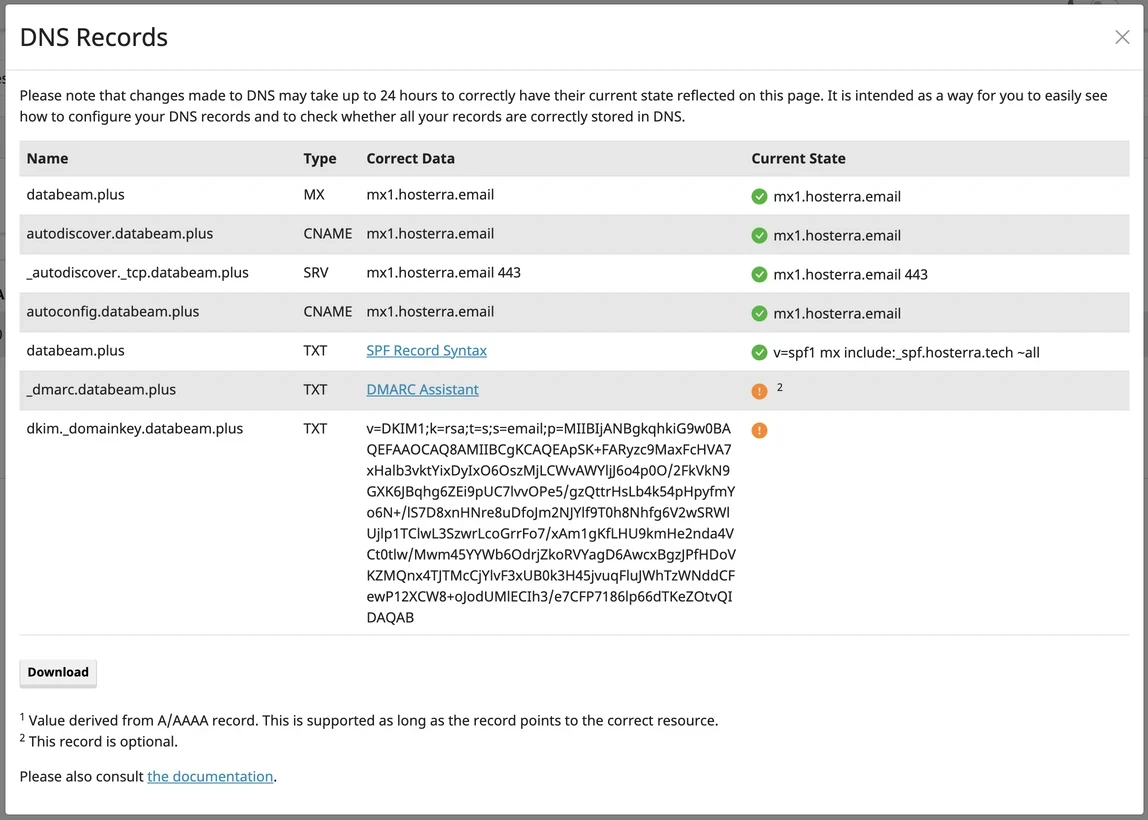](https://hosterra.help/uploads/images/gallery/2024-01/mailhosting-dns-en.webp) If all the icons are green, you've set up your service correctly and it's fully operational. If some icons remain orange or red, here's what you can do: - Orange icon: the record is not detected (it is perceived as "non-existent"). In this case, check that it does exist in your DNS and wait for propagation to complete. - Red icon: the record is incorrect (it is perceived as "erroneous"). In this case, check that it has been entered without error in your DNS, or that there are no duplicates, and then, after correcting the record(s) in error, wait for propagation to fully complete.DNS propagation can sometimes take up to 24 hours.
DMARC record is considered optional. However, if you wish to avoid any deliverability problems, it is recommended that you set it up.
### Testing you configuration (optional) To test your SPF + DKIM + DMARC configuration, you can uses tools like: - [Red Sift's Investigate tool](https://redsift.com/tools/investigate) - [M@ilGenius](https://www.mailgenius.com/spf-and-dkim-key-email-checker/) - [Mail-Tester](https://www.mail-tester.com/) # Mailbox migration To migrate a mailbox from a previous provider to Hosterra Email, use the [mailbox synchronization feature](https://hosterra.help/books/mail-hosting/page/mailboxes-synchronization "Mailboxes synchronization"). Once you've entered the standard parameters (target and source mailboxes, server and port of your previous provider), run a first simulated synchronization (penultimate checkbox in the window). If the simulation was successful, you can activate your task and save it.The minimum synchronization frequency is 20 minutes. You must therefore wait until this time has elapsed for the first synchronizations to take place.
# Domain migration If you need to migrate all your existing email services to Hosterra Email, we strongly encourage you to proceed as follows: 1. [Create](https://hosterra.help/books/mail-hosting/page/create-a-mailbox "Create a mailbox") in Hosterra Email all the mailboxes you have with your previous provider. 2. [Migrate](https://hosterra.help/books/mail-hosting/page/mailbox-migration "Mailbox migration") all old mailboxes to the new ones and let synchronization enabled. 3. [Configure your DNS](https://hosterra.help/books/mail-hosting/page/dns-configuration "DNS configuration") to point to Hosterra Email services. 4. Wait for DNS propagation to complete: your old server will continue to receive some mails until propagation is complete. 5. [Configure client software](https://hosterra.help/books/mail-hosting/chapter/client-configuration "Client configuration") to use Hosterra Email mailboxes. 6. After 24 hours, delete the synchronization tasks created in step 2, as they are no longer required: all your mails now goes through Hosterra Email.By performing the migration operations in this order, you can be sure of not losing any old or new mail during DNS propagation (which can take up to 24 hours).
# Securing your account You can increase the security of access to your Hosterra Email account by choosing to activate multi-factor authentication or switch to a passwordless authentication mode.If you log in as a mailbox user, the security options are on the home page. If you log in as a domain administrator, you can access these options via the *System > User Settings* top menu.
### Multi-factor authentication To add a second authentication factor to your Hosterra Email account, go to your [mailcow administration interface](https://hosterra.help/books/mail-hosting/page/administration-mailcow "Administration (mailcow)"). Choose your preferred method (Yubico, WebAuth or software OTP) and follow the configuration wizard. ### FIDO2 To log in without passwords (using keys), click on the **Register FIDO2 device** button and follow the configuration wizard. # Using webmail (SOGo) Le [webmail](https://doc.hosterra.eu/books/hebergement-mail/page/webmail-sogo "Webmail (SOGo)") Hosterra Email vous permet de vous passer complètement de logiciel client. Il vous permet, depuis n'importe quel périphérique ayant accès à internet, de consulter et écrire vos mails, gérer vos agendas et listes de contact. # Change mailbox name To change your mailbox name (the name that will be displayed to your e-mail recipients), go to Preferences ("Settings" icon in the top left-hand corner of the interface). Click on the **Mail** item in the left-hand bar, then choose the **IMAP Accounts** tab. You'll then be able to set everything concerning your "identity", including the name that appears in your e-mail recipients' inboxes.